- how we can add and deploy a new User Pool and User Pool Domain, via GraphQL API’s cloud infrastructure code
In order to follow this tutorial, you must use Webiny version 5.18.0 or greater.
The code that we cover in this section can also be found in our GitHub examples repository  . Also, if you’d like to see the complete and final code of the application we’re building, check out the
 full-example folder.
Adding User Pool and User Pool Domain
In this section, we’ll be performing all of the needed cloud infrastructure code changes within the dev stack. Note that you should perform the same changes within the prod stack as well.
In case you missed it, check out the dev and prod Stacks section.
Let’s start by defining a new User Pool and a User Pool Domain within our GraphQL API’s cloud infrastructure code.
Inside of the pinterest-clone/api/pulumi/dev folder, let’s create the new cognito.ts file. It should export the following Cognito class that encapsulates new cloud infrastructure code:
import * as aws from "@pulumi/aws";import * as pulumi from "@pulumi/pulumi";import * as crypto from "crypto";
const BASE_ATTRIBUTE_NAMES = ["email", "given_name", "family_name"];
class Cognito {  userPool: aws.cognito.UserPool;  userPoolDomain: aws.cognito.UserPoolDomain;  constructor() {      // Creates a new user pool. For more information on all of the available options, see:      // https://www.pulumi.com/docs/reference/pkg/aws/cognito/userpool/      // https://docs.aws.amazon.com/cognito-user-identity-pools/latest/APIReference/API_CreateUserPool.html      this.userPool = new aws.cognito.UserPool("pinterest-clone", {          schemas: BASE_ATTRIBUTE_NAMES.map(name => ({              name,              attributeDataType: "String",              required: true,              developerOnlyAttribute: false,              mutable: true,              stringAttributeConstraints: {                  maxLength: "2048",                  minLength: "0"              }          })),          passwordPolicy: {              minimumLength: 8,              requireLowercase: false,              requireNumbers: false,              requireSymbols: false,              requireUppercase: false,              temporaryPasswordValidityDays: 7          },          autoVerifiedAttributes: ["email"],          usernameAttributes: ["email"]      });
      // Creates a user pool domain over which we'll be able to access the Hosted UI authentication flow.      // For more information on all of the available options, see:      // https://www.pulumi.com/docs/reference/pkg/aws/cognito/userpooldomain/      // https://docs.aws.amazon.com/cognito-user-identity-pools/latest/APIReference/API_CreateUserPoolDomain.html      this.userPoolDomain = new aws.cognito.UserPoolDomain("pinterest-clone", {          domain: this.userPool.id.apply((id: string) => {              // Create a unique MD5 hash of the User Pool ID and use that for the domain name.              return crypto.createHash("md5").update(id).digest("hex");          }),          userPoolId: this.userPool.id      });  }
  // A simple getter that will construct and return us the complete user pool domain.  getUserPoolDomain() {      return pulumi.interpolate`${this.userPoolDomain.domain}.auth.${process.env.AWS_REGION}.amazoncognito.com`;  }}
export default Cognito;
As we can see, we’re first defining a new User Pool, where we’re configuring some of its essential configuration parameters:
- schema attributes of the user pool (
schemas) - password rules (
passwordPolicy) - enabling verification with a confirmation code (
autoVerifiedAttributes) - using
emailattribute as the username (usernameAttributes) .
Then, in order to enable the mentioned Hosted UI authentication flow, we’re also defining a new User Pool Domain, which only takes two configuration parameters - domain and userPoolId. Notice how we’ve assigned `pinterest-clone-${process.env.WEBINY_ENV}` to the former and used process.env.WEBINY_ENV as part of the value. With this approach, we’re simply ensuring that within every environment we deploy into, we’re using a globally unique domain name. We cannot use (or at least shouldn’t) the same domain name within two different environments.
The next step is to import the new file in the existing index.ts entrypoint file, located in the pinterest-clone/api/pulumi/dev folder. Once imported, we’ll also need to perform two additional changes.
First, in order for the new cloud infrastructure code to be actually executed, we’ll instantiate the imported Cognito class. Second, we will modify the list of returned values, which, as previously mentioned, represents the stack output.
Ultimately, this is how the updated index.ts entrypoint file should look like:
import DynamoDB from "./dynamoDb";import Graphql from "./graphql";import ApiGateway from "./apiGateway";import Cloudfront from "./cloudfront";import Cognito from "./cognito";
// Among other things, this determines the amount of information we reveal on runtime errors.// https://www.webiny.com/docs/how-to-guides/environment-variables/#debug-environment-variableconst DEBUG = String(process.env.DEBUG);
// Enables logs forwarding.// https://www.webiny.com../../core-development-concepts/basics/watch-command#enabling-logs-forwardingconst WEBINY_LOGS_FORWARD_URL = String(process.env.WEBINY_LOGS_FORWARD_URL);
export default () => {const dynamoDb = new DynamoDB();const cognito = new Cognito();
const api = new Graphql({  dbTable: dynamoDb.table,  env: {    // The single DynamoDB table in which data can be stored and queried.    DB_TABLE: dynamoDb.table.name,    DEBUG,    WEBINY_LOGS_FORWARD_URL,  },});
const apiGateway = new ApiGateway({  routes: [    {      name: "graphql-post",      path: "/graphql",      method: "POST",      function: api.functions.api,    },    {      name: "graphql-options",      path: "/graphql",      method: "OPTIONS",      function: api.functions.api,    },  ],});
const cloudfront = new Cloudfront({ apiGateway });
return {  region: process.env.AWS_REGION,  apiUrl: cloudfront.getDistributionUrl(),  graphqlApiUrl: cloudfront.getDistributionUrl("/graphql"),  dynamoDbTable: dynamoDb.table.name,  cognitoUserPool: {    id: cognito.userPool.id,    domain: cognito.getUserPoolDomain(),  }};};
As names suggest, the cognitoUserPool.id and cognitoUserPool.domain properties represent the ID and the domain of the deployed User Pool and User Pool Domain, respectively. We’ve added these values to the stack output simply because we’ll later need them within our React application code (more on this soon).
Deployment
In order to continue further development, the new cloud infrastructure resources need to be deployed.
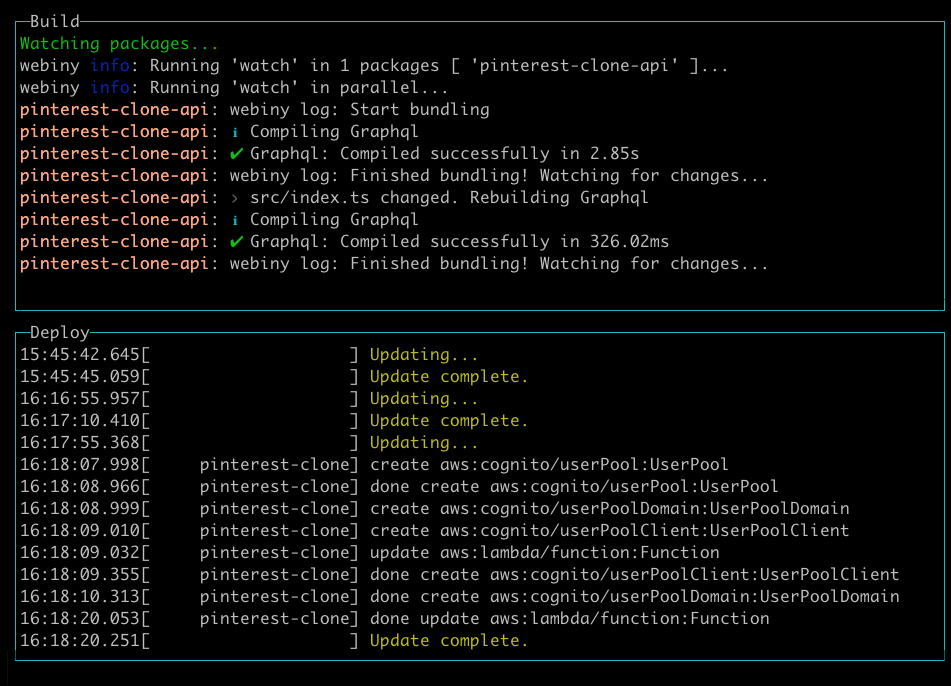
If you had the webiny watch command up and running while making the shown changes, the new cloud infrastructure resources should have been deployed automatically for you:
If not, you can either start a new watch session, or simply deploy the changes via the webiny deploy command.
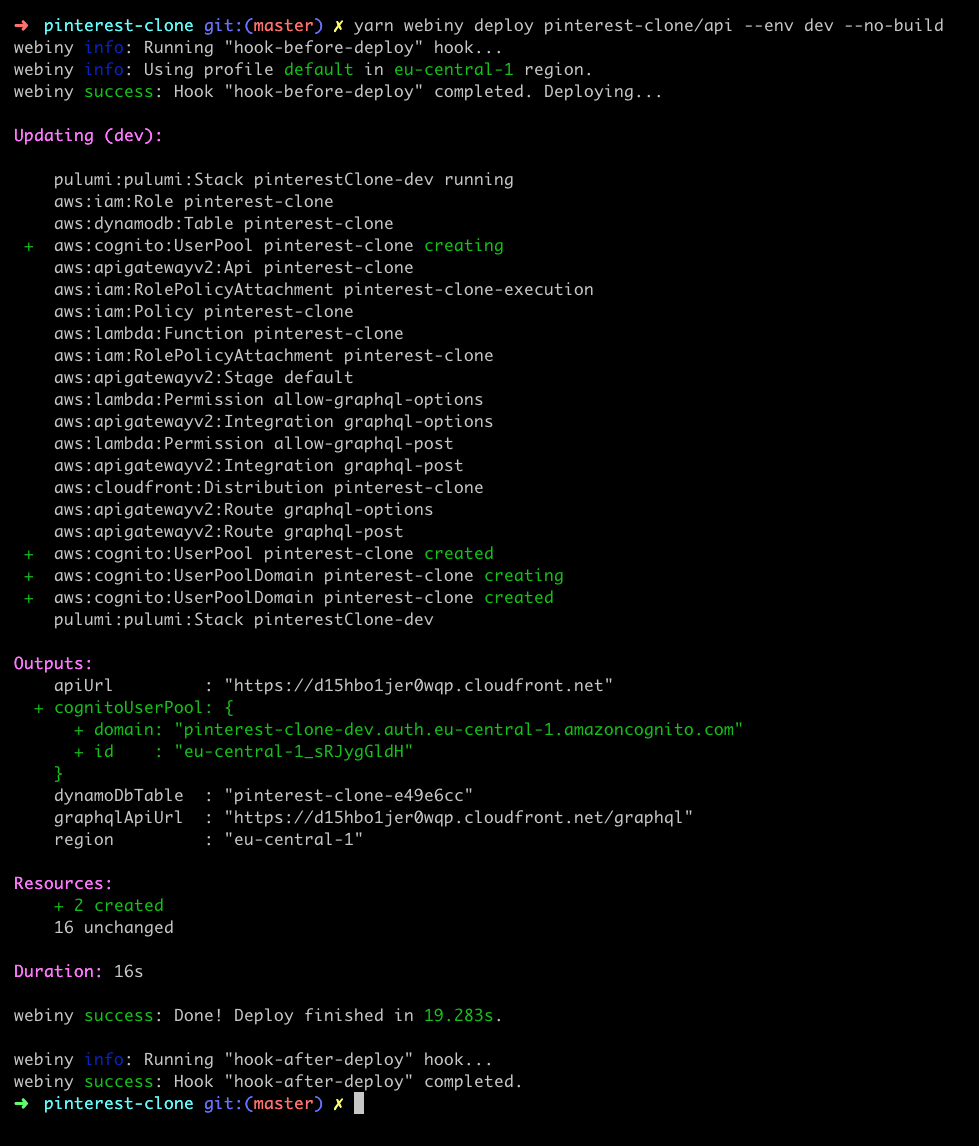
As seen in the screenshot above, except all of the cloud infrastructure resources-related changes, in the Outputs section, we can also see the updated stack output.
Ultimately, both approaches will ensure the new cloud infrastructure resources are deployed and are ready to be used.
Final Result
In this section, we’ve defined and deployed a new User Pool and a User Pool Domain, all within our GraphQL API’s cloud infrastructure code. Also, by adding the cognitoUserPool.id and cognitoUserPool.domain stack output properties, we’ve exposed the ID and the domain of the deployed User Pool and User Pool Domain. This will enable us to later retrieve these values within our React application code and connect everything together.
In the next section, we’ll still be playing with the cloud infrastructure code, but this time within our React application, where we’ll need to define a new User Pool Client .